Thursday, 31 October 2024

Humble Rays cafe, Carlton (and ghost toast)

I first visited Humble Rays cafe in Carlton back in 2017.  I made a note back then that it was an extremely instagrammable cafe.  When I visited twice in the last few weeks I was impressed that the cafe is still doing a great job in presenting beautiful food, such as the above ghost toast for Halloween. 

It was quieter recently than in 2017.  Back then when students at the nearby University of Melbourne had to attend lectures and tutorials in person.  Universities were much busier before the pandemic, especially during semester.  I don't think I queued on that day but I saw queues outside Humble Rays when I passed around that time.


When I went there it was busy with lots of international students.  The proximity to inner city universities and Asian fusion vibe of the menu no doubt is a draw card.

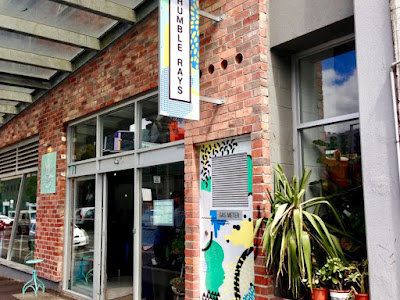
Humble Rays has a lovely colourful spacious entrance with lots of greenery.

The menu has changed since 2017.  On that visit I had Soba Spring Bowl: Organic soba salad, cucumber, quinoa, sweet corn, tomato, seasonal sprouts, seaweed, sesame tofu, sweet chilli ponzu saucese.  The sesame tofu was a bit lacking in seasoning but I loved the noodles and sauce.

I can't remember the day but I know that I had Green Tea Skookie for dessert.  It was a green tea double chocolate chip cookie,  house made marshmallow, vanilla ice cream, shaved white chocolate, matcha cookie crumbs.  The cookie was a slightly dry but nothing that a pile of toasted marhsmallow and ice cream could not fix. 

This collection of plants is lovely but they aren't there any more. 

So much has changed over the past seven years, but I was glad that Humble Rays is still here when I had their Smashed Avocado a few weeks back.  On the menu it looked nice: .Avocado on toasted bagel, Spiced hummus, Feta, Crispy kale, Sesame dukkah.  When it came it was more impressive with tomatoes, radishes, popped quinoa and amazing fried lotus slices.  I think I even see fried chickpeas in there but am not sure if I remember them or just wish I did.  There are not many other dishes I would eat on the menu but this is a winner, with a non-feta version for vegans.

Then we came back this week.  Where there used to be leafy plants were these evil looking jack o'lanterns.  Coincidence?  Or perhaps it was just that Humble Rays does a better job of Halloween decorations than keeping plants alive.  They even had a jack o'lantern bowl on the counter with lollies for a little trick or treat dip!

This grinning skull ghoul is another of the Halloween decoration.  Behind are the words "stay hungry, be humble" that you can see in one of the above 2017 photos.

I enjoyed checking out the cakes in the display cabinet under a Happy Halloween sign. 

The display cabinet offered both matcha and yuzu madeleines.  The green ones were so pretty but I am quite fascinated by yuzu flavours.  I think it could be my first madeleine ever.  I was surprised at how soft it was.  Soft and citrussy with a light sweet glaze.  It reminded me of the fluffy orange and lemon cakes that my mum baked when I was a child.  How very Proustian of me!

The reason we were there was to sample the Halloween menu specials.  Sylvia ordered a Pumpkin spiced home brew  of House Made Pumpkin Spiced Syrup, Cream, Sweetened Cold Brew, and Gingernut Biscuit crumbs ($9.50).  She described it as being pleasantly spicy and sweet, as much like Christmas as like Halloween.


The Halloweeen piece de resistance was the Spooky toast.  We called it ghost toast for obvious reasons.  It was a masterpiece of Honey Butter Toast, Salted Egg Pumpkin Custard, Meringue, Mochi Pumpkin Ice Cream, Pepita And Coconut Flake Candy, and Fresh Fruit.  The ghost was a scoop of ice cream with a floaty mochi topping.  The tiny ghost meringues were so cute.  And it all came together beautifully.  Even Sylvia loved who is not a fan of pumpkin.  I enjoyed my share of it more than I expected.  It was so delicious that I would definitely try some of the other fancy desserts if I found myself faced with this choice!


Humble Rays
71 Bouverie Street, Carlton
03 8354 8459
Open 7 days a week, 8am-4pm
www.humblerays.com

Tuesday, 29 October 2024

Sourdough scallion pancakes

Work has been really busy with a 6 week series of workshops.  By the end of each working week I am always glad to have a quiet day of work from home.  Occasionally on these days I stop a bit longer for lunch.  I enjoy that flexibility.  Last week I had a 90 minute lunch break to make sourdough scallion pancakes while Sylvia was out with my parents.  I have wanted to make these for so long and was delighted at how good they tasted.

I have enjoyed scallion pancakes at Asian restaurants over the years.  My best memories are of the thick crusty flaky coils of fried scallion pancakes at ShanDong Mama years ago.  I have read about making them at home and it always seems difficult.  I was searching for a much simpler recipe when I came across the one on Halicopter Away.  I understand that adding sourdough into the mix is probably more complex for a lot of people but if, like me, you look for interesting ways to use sourdough discard to keep the starter healthy, then you will embrace the idea.

I have embraced the idea of scallion or spring onion pancakes because not only do I often need to use my sourdough starter to keep it healthy, but I also like to buy bunches of spring onions for salads.  Some weeks we use lots of them but on other weeks I have lots of spring onions to use up.  All those greens in the fried flatbread make it seem so much healthier.  But who am I kidding!

I was pleased that these worked well with wholemeal flour.  Oiling the surface rather than flouring it seemed to help make the dough soft but the 30 minute rest made a surprising difference to the texture.  I am curious as to whether it was because the starter was healthy and bubbly or if this would work with a more neglected starter.  Thirty minutes seems like a long time to wait when you are squeezing it in at lunchtime but, as you feed the starter, chop the spring onions and empty some bins, it whizzes by.  

I like mine rolled out a bit thicker for the chewy flaky taste.  You can see the swirls in this pancake I have rolled out.  This was one of my roundest pancakes.  I found that I had to tuck in the end of the scroll to stop it being a loose piece of hanging off the edge.  It was also difficult to roll it out without a ripped edge where a clump of spring onions broke through the dough.  But these edges fried crisp so no need to aim for perfection. 

I read that if you have some gaps when rolling it up, this can make it more flaky.  That means next time I might not squeeze the air out of the sausage of dough before scrolling it up.  I have dreams of making this recipe regularly and tweaking it each time.  There are so many scallion pancake recipes out there and lots of ideas to try.

However my reality is that I never have enough time in the day.  Work and home life have been busy.  If that elusive work-life-balance meant never having enough time for either than I could claim great balance!  So I am grateful for all the support I get.  This extends to my parents who, on the day I made the scallion pancakes, came to admire Sylvia's constantly expanding garden of pot plants, took her out for a coffee and then did the dishes for me before they went home.

We have been having home made pizza most Fridays lately but I have not made much bread.  My starter has been a little neglected, especially in a week when I don't make pizza.  So one reason I made these pancakes was to give me a reason to feed the starter a few times in a week to bring it up to healthy.  Not only does this mean I have good starter when I want to use it but it also means I was able to give some starter to my friend Sarah who was down from Sydney.  I am very proud of my starter's offspring now travelling interstate and look forward to hearing about it in the new home.

More recipes for flat sourdough "bread" on Green Gourmet Giraffe blog:

Antipasto focaccia
Banana sourdough flatbread
(v) 
Fast track sourdough pizza bases (v)
Kale sourdough tortillas (v)
Sourdough toss-off flatbreads (v)

Sourdough Scallion Pancakes
Slightly adjusted from Halicopter Away
Makes 4 pancakes

  • 1 cup (200g) sourdough discard (mine was quite bubbly and bouncy)
  • 1 cup (100g) plain flour (I used wholemeal)
  • 1/2 cup neutral oil, approx (I used rice bran)
  • 1 tsp salt, approx
  • 1/2 cup scallions (I used 3 fat spring onions), finely sliced

Mix sourdough discard and flour until shaggy and then use hands to knead in bowl until comes together.  Knead dought for a few minutes on floured surface until smooth.  Cover and leave for about 30 minutes or until slightly puffed and a little softer (this resting time makes it easier to handle).

Heat frypan before starting to prepare the pancakes.  (I use a cast iron frypan which can cope with a lot of heating and also is great at giving lovely golden brown color when frying pancakes.  I heat mine on high and then reduce to medium heat about 5 minutes before frying.)

Cut dough into four pieces. Roll out to about 18cm long oblong.  (I used oil for rolling and handling dough.) Spread or rub with a small spoonful of oil (about 1 tsp), sprinkle with about 1/4 cup of scallions and grind some salt over the dough.  Roll up from long edge as tight as possible into a sausage.  Roll it tightly into a scroll.   Flatten slightly with your hands and tuck the end of the scroll in tightly so it is part of the circle rather than a tail hanging out.  Roll into a round pancake but don't get too worried if a clump of spring onions rips through the dough.  Imperfections just mean more crispy edges!  When rolling it as thin as I could it was still smaller and thicker than the original oblong of dough that I rolled out.  You can choose to roll it as thin or thick as desired.  It is a personal decision.

Heat about a tablespoon of oil over medium heat in the frypan.  Place your pancake in the pan for about 3-5 minutes on the first side or until golden brown.  Flip over and fry for another few minutes for the second side or until golden brown marks. Press down on the second side while it fries. 

While each pancakes was frying, I rolled out the next pancake until all the four pieces of dough were prepared.  Eat warm.  I also found they made a nice snack once cooled.

NOTES: 

  • My starter was in a healthy bubbly bouncy state and ready to use.  I often use sourdough starter in flatbreads no matter what the state.  If it is thin and a bit old I find it requires a little more flour.
  • My dough was a bit dry.  Perhaps the wholemeal flour made it drier.  Next time I would use slightly less flour and add more if needed.  I think it was helped by the 30 minute rest which made it much softer.  It also helped that instead of using flour to knead and roll the dough, I used oil to keep it from sticking to the surface and rolling pin.
  • I would like to try this recipe with an old thinner starter discard and to roll out the dough without the 30 minute rest to test how it works when I don't have much time and need to use up discard that should have been fed days ago.
  • I am interested in the scallion pancake recipe at red house spice which make a paste of flour, oil and seasoning to spread on the rolled out rounds of dough before sprinkling with spring onions.  It also makes the point that pancakes can be rolled out thin or thick and that it helps to cook them with a lid on the frypan.
  • Recipes I have seen include a dipping sauce.  While we often use tamari or ponzu for dipping sauces, I really enjoyed these without any accompaniments either hot or room temperature on the same day of frying.

On the stereo:
Chaos Angel: Maya Hawke

Thursday, 24 October 2024

Creamy cannelini beans 2 ways: with kale or with cherry tomatoes


Last week in the supermarket I saw that tins of my favourite bean brand (annalisa) were 2 for $2.  That was exciting because they have got so expensive over the past months.  But I was pretty sad that there were no cannelini beans left by the time we got there.  I have two favourite creamy cannelini bean meals of late and am sharing both the recipes here.  One is filled with greens and is vegan while the other has a tomato sauce and a crispy grilled cheese topping.  What I liked about both was that they used the starchiness of the beans to make a comforting creamy consistency.


In the Creamy Cannellini Beans with Kale a tin of the beans are blended with tahini and kale to make a super creamy sauce.  In fact mine needed a lot of extra water because it was so creamy.  It was the best of both worlds because the stew had plenty of texture with another two tins of beans and lots of kale added to the sauce.  Mine got really thick so I needed to add a lot more liquid to thin it.  

Although I forgot to add fresh herbs on top, I stirred in quite a few sundried tomatoes for colour and to cut through the richness of the sauce.  It was excellent with some fresh bread.  I took a tub of leftover beans to work with bread and also ate it like a dip with crackers.  This was excellent comfort food but filled with healthy ingredients and great flavours.

A few months ago in August I made a creamy tomato gnocchi.  It was really good but I wanted less carbs and more protein.  I decided to try it with beans instead of gnocchi.  It looks far more like your traditional home made baked beans than the previous bean dish but still seemed quite different.  The beans were simmered in a tomato sauce but not that much liquid so some of the beans broke down and contributed to the creaminess.

One of my favourite things about a pasta bake is the crisp cheesy topping.  I loved that this dish still have the great golden melted cheese on top.  It was quickly done under the grill.  I really love my cast iron frypan which moves so easily from the stovetop to under the grill (also known as broiler).  I am unsure that I would put most of my ovenware under the grill as I am not confident how it would stand up to the intense heat but the cast iron just laps it up.  Literally.  It gets so hot!

I served my beans with some hoop pasta, celery and asparagus.  Sylvia preferred hers with much more pasta but really loved it too.  It would also be great with quinoa or rice or other grains, especially if you are after a gluten free meal. Sylvia did tell me I was a little heavy handed with the thyme which I only roughly measured by shaking some from a bunch of drying thyme that Sylvia had put aside after she took out my 17 year old woody thyme to replace with a new young thyme plant. 

These comforting creamy bean dishes are great for a chilly winter night.  But with lots of spring vegies they work well too.  It is only halfway through spring and we had a 30 C day this week.  It is too soon to be dealing with such hot days so I look forward to a few more snuggly bean meals before summer really turns up the temperature! 

More cannelini bean recipes on Green Gourmet Giraffe blog:

Bean, barley and tomato stew (v)
One pot pasta with beans and tomato sauce (v)
Pea, mint and bean dip (gf)
Quick baked beans (gf, v)
Smoky apple baked beans (gf, v)


Creamy cannellini beans with kale 
Adapted from Creamy cannellini bean with kale
Serves 6-8

  • 2 tbsp olive oil
  • 1 onion, chopped
  • 4 garlic cloves, finely chopped
  • 1 tsp fresh thyme leaves or 1/2 tsp dried Italian herbs
  • 3 x 400 g tins of cannellini beans, divided
  • 1 1/2 cup soy milk, divided
  • zest of quarter to half a lemon
  • 1/4 tsp stock powder
  • Seasoning
  • 2 1/2 tbsp white miso
  • 2 tbsp tahini
  • good squeeze of lemon juice
  • 1 tbsp nutritional yeast flakes
  • Half bunch of kale (I used curly kale)
  • Fresh parsley and sun dried tomatoes, to serve (optional)

Fry onion in oil until soft and translucent (but not browned).  Stir in garlic and thyme for a minute.  Then add 2 x drained tins of beans, three quarters of a cup of milk, stock powder, a pinch of salt and a good grind of pepper.  Simmer over a low heat.

While the mixture simmers, place remaining 1 x drained tin of beans, the remaining three quarters of milk, miso, tahini, lemon juice and nutritional yeast flakes in the blender.  Puree to a smooth mixture.

Add bean puree to the simmering beans and stir over low heat until blended.  Add more water if it thickens too much (I often use some water to wash out the blender and used it to thin the bean mixture.  It was useful because I had to add quite a bit of water.)

Wash, destem and chop the kale and add to the bean mixture.  Simmer for about 5 minutes until kale wilted.  Taste and adjust seasonings with salt, pepper and lemon juice.  Serve topped with sun dried tomatoes and parsley.  (I suggest serving alongside bread or passta.)

Cheesy creamy tomato cannelini beans
Adapted from By the Forkful
Serves 4

  • 1 tbsp oil
  • 1 small red onion, chopped
  • 200g cherry tomatoes, chopped
  • 2 garlic cloves, finely chopped 
  • 1/2 tsp smoked paprika
  • 2 x 400g tins of cannelini beans (about 3 cups)
  • 1/3 cup (80 ml) water, or more
  • 2 tbsp tomato paste 
  • 1 tsp dried Italian herbs  
  • 1 tsp apple cider vinegar
  • 1 dessertspoon cream cheese 
  • Grated cheese (I used a mozzarella, cheddar and parmesan mixture)
  • 2 tsp stock powder
  • Salt and pepper to taste
  • Fresh herbs such as basil, parsley or thyme, for garnish

Fry onion in oil over medium heat for about 5 minutes until softened.  Stir in tomatoes and garlic for a minute or two until the garlic is fragrant.  Add drained beans,water, tomato paste and herbs.  Stir well and simmer for 5-10 minutes until the sauce thickens.  I found I had to add a bit more water as it thickened a bit much.  

Stir in cream cheese.  If you have an ovenproof frypan, sprinkle cheese over the beans (or move to a shallow ovenproof dish.  NB I used a cast iron frypan which is great for putting under the grill.)  Melt cheese under the grill until golden brown (up to 5 minutes).  Serve hot.

On the Stereo:
Marlinchen in the Snow: Charm of Finches

Friday, 18 October 2024

Street Art in Melbourne city - CBD 2022-2024

On a day when I was thinking about where to go for a ride, I read about street artist Luke Kasper had painted a mural of Pesto the fluffy penguin chick (below) who has been a recent star attraction at the aquarium.  So I rode to Higson Land in the city.  I took quite a few photos of street art and found some other photos in my archives to share here.

October 2024: Higson Lane, AC/DC Lane and Duckboard place.  These lanes off Flinders Lane have a lot more interesting street art at the moment than the Hosier Lane, which has become a tourist attraction for its street art.


April 2024: Hoarding outside Young and Jackson Hotel in Flinders Street.  I think this is part of the construction work on the new metro tunnel.  I once had a seagull take a sushi handroll out of my hand whole so the gull with the chips seems believable.  I am not sure it if is spongebob or a bin with a grin!


April 2023 - Hosier Lane and Scott Alley off Flinders Lane.


February 2022: Meyers Place off Bourke Street


More Melbourne city street art photos on Green Gourmet Giraffe blog:

Sunday, 13 October 2024

Street Art in Melbourne city (CBD) 2021 with covid images


I decided to collate some old and new street art photos from the city today.  There were so many from this one bike ride back in mid April 2021 that they deserve their own post.  
 
It was a memorable day.  Back then we had survived our first long covid lockdown in Melbourne and still had restrictions.  Yet it was a moment of hope that we were dealing with covid well and would be ok.  It was before all the deaths, the ugly politics over vaccines, the peak of the terrible toll on the health system, and the minimising of covid by the mainstream that left many vulnerable people feeling left behind.
 
It was a day of rediscovering whimsy and fun in the lanes near Spencer Street but also finding politics in the street art, especially in a sobering photo exhibition of health care professionals with reflections that brought me back to reality of what we had been through.  The exhibition is long gone and I am not sure how many of the other artwork remains.
 
I am presenting the photos today with minimal text so that I can post them and go on my way with so many other things to do.  Other city street art photos will come soon, I hope!


There was very little street art in this lane but I loved that it was called Equitable Place/  It was near a lunch at Seedling that I wrote about in my April 2021 post.

This is the Information board on the Surge exhibition by Pheobe Powell and Kate Disher-Quill.  This outdoor exhibition was held on the hoardings around the construction site on the City Square on Collins Street where the new Town Hall Metro station is still being built.  The last photo gives a big picture of the site.  The reflective quotes in the artwork show the exhaustion and the hope that was about at the time.


More Melbourne city street art photos on Green Gourmet Giraffe blog: