Wednesday 29 April 2020

Sloth cupcakes for 13th blog anniversary

If you had described my current life to me when I started my blog 13 years ago, I don't think I would have believed you.  I might have laughed.  I might have stood with my mouth gaping.  I could not have taken you seriously.  But here I am in CoVid19 lockdown with an 11 year old daughter who has made amazing sloth cupcakes to take to her dad's home for his "Iso" birthday.  Actually I might have found it believable if you had told me I would have a daughter who is a great baker. 

It is no coincidence that Sylvia's dad's birthday coincides with the blog anniversary.  My first blog post was his vampire birthday cake.  Much has changed since then.  I have made E a birthday cake for my blog anniversary every year since.  This year however we changed things up and made  cupcakes instead of a big cake.  Sylvia decided on sloth cupcakes and did a lot of the work.

The cupcake recipe is one that she has made before and also kept a friend company on face time while they made it.  She asked what flavours E would like.  When he said spice and caramel, she decided to add cinnamon and a hint of mixed spice.  Those cupcakes smelled amazing.

The crowning glory of the cakes was the caramel buttercream.  We made a buttercream and added a few spoonfuls from a jar of Bonne Maman Caramel Sauce.  It was so good.  We used salted butter but could have perhaps used a little more salt.

Then we added fondant faces.  Sylvia did most of the work bu I helped a bit.  We kneaded colour into the fondant and rolled it out without it getting too sticky (thanks to a pinch of icing sugar), covered it up without it getting too dried and had fun drawing on the mouths in different expressions.  Sylvia and I have come a long way since we first started playing with fondant at the start of last year.  (And I was pleased we still had some black fondant leftover from the cats.)

They took some work and didn't taste that great but they looked so cute.  (I ignored the colleague who asked if they were raccoons).  The last few when we ran out of fondant were just spread with caramel.  They tasted the best!  But I also loved the raspberry bullets that Sylvia chose for the noses.  It was very kind of her to pass on the black jellybeans because she knew her dad didn't like them.

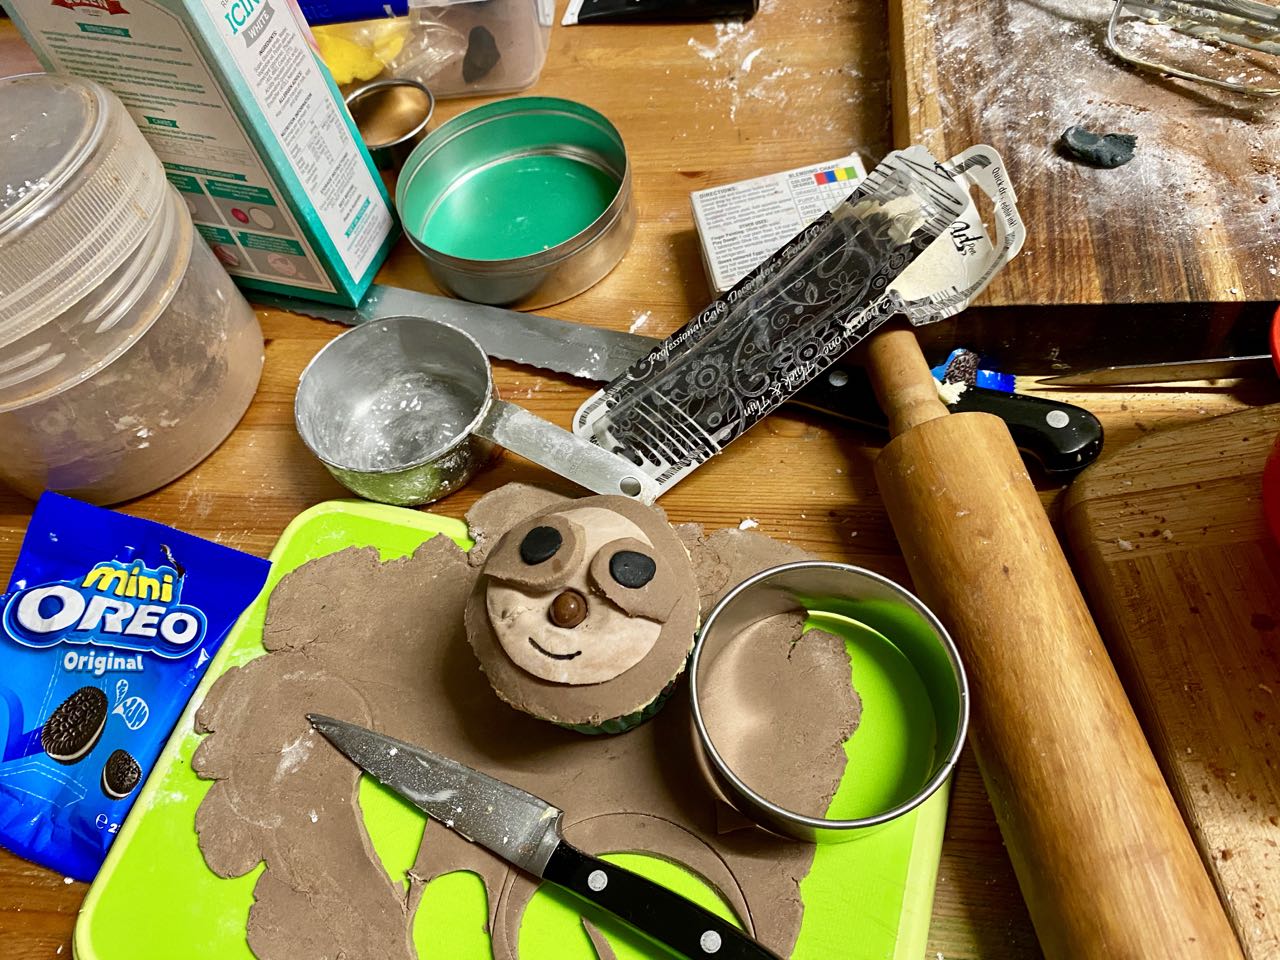
We also bought oreos for the eyes but reverted to fondant after a trial.  So we ate too many and then I opened a tin of chickpeas to eat plain because we needed something savoury.  We ate late that night - just chopped vegies, grated cheese and tacos, all scattered with a little taco seasoning that had been sitting in my shelves too long!  I read that we should create some fun memories in lockdown and I think making these cupcakes might be a moment to remember!

While we decorated, we talked about sloths.  Sylvia said they were lazy in a cute way.  I couldn't help thinking that sloths were not only popular with the kids but could be the mascot of Covid19 lockdown.  One of our favourite shows lately is Brooklyn 99 in which Jake does a David Attenborough impression of him saying "the majestic sloth".  It made me think of one of my favourite childhood shows, The Goodies (RIP Tim Brooke Taylor), in which Attenborough was parodied as David Rabbitborough.  It seemed a fun parallel that both of us had learned about Attenborough as kids through parodies without actually watching the real thing.  Then Sylvia began to watch his documentaries.

The moral of the story is that kids today have far greater access to learning where parodies originate than I did as a kid.  But also that one thing that is certain is change!  And so I end this post with a brief reflection on my time as a blogger.  So much change!  Since starting blogging 13 years ago I have met lots of amazing people, had lots of inspiration for dinner, seen blogging transform from a community to a career, created a sourdough starter, become the sort of person who makes pizza every Friday for her kid and  I have learnt so much about photography, curries, smoothies, tacos, kale salads, vegan baking, nut roasts, gingerbread, smoky flavours, nutella, pancakes, and sausage rolls that no one will ever believe are not meat!  It's been fun and I am grateful to still be here on my blog being inspired in the kitchen, even if I am not eating out right now.  It was a little sad that we weren't able to share the sloth cupcakes, thanks to lock down, but as always it is a joy to share them here on my blog with you.

More animal shaped cakes on Green Gourmet Giraffe:
Animal cupcakes: chicks, pigs, frogs and mice
Butterfly cake (2)
Cat cupcakes
Green Giraffe cake
Hedgehog cake
Monkey cake
Owl and spider cupcakes
Viking cat cake

How to make sloth cupcakes

You will need:
Cupcakes (see below)
Caramel buttercream (see below)
White fondant
Cocoa
Brown food colouring (or more cocoa, black and red food colouring)
Black fondant
Bullets or black jelly beans
Edible black marker or black icing in a bag with a thin writing tip.

Knead a spoonful or two of cocoa into a good handful of white fondant to make it light brown.  Stamp out circles slightly smaller than the cupcake top.  For each circle cut out 2 leaf shaped pieces to be under the eyes.  I used a piece of cardboard cut into the shape I wanted so I could have them all similar size and used scissors to cut around them.  Cover and set aside.

Take a good handful of white fondant and mix in colouring to make it a darker brown.  (We did not have brown food colouring so I mixed in cocoa, a little black and a little red food dye).  Stamp out circles the size of the cupcakes (one each for each of the lighter brown circles).  Cover and set aside. 

Spread caramel buttercream on a cupcake.  Top with a circle of darker brown fondant, then use a small amount of water to stick on a smaller light brown fondant (have a small bowl of water to stick on the other pieces of fondant).  Push a bullet or jelly bean in the middle of the light brown circle to make the nose, then place a leaf shape either side.  Roll a two black circles to be on the leaves and then white dots to place on the black to make eyes.  Use edible black marker (or black icing in a bag with a writing tip) to draw the mouth.  We did different expressions for fun.  Repeat with the rest of the cupcakes.  If you run out of fondant or energy these cupcakes taste amazing with caramel buttercream and no fondant.

Vanilla Spice Cupcakes
Adapted from Life, Love and Sugar
Makes 20-24 cupcakes

2 1/2 cups plain white flour
2 cups sugar (we used caster sugar)
3 tsp baking powder
1 tsp cinnamon
1 tsp salt
1/4 tsp mixed spice

1 cup milk (we used soy)
1/2 cup vegetable oil
1 tbsp vanilla extract
2 large eggs
1 cup water

Line 2 x 12 cupcake tins with papers and preheat oven to 180 C.

Mix dry ingredients in a large bowl.  Whisk together the wet ingredients in a small bowl.  Fold the wet ingredients into the dry ingredients.  (This could all be done with electric beaters but we did it by hand.)

Spoon mixture into cupcake papers, filling them about a third.  Bake for 20-25 minutes or until a skewer comes out clean.  I found these cupcakes damp by the next day so they are made to be frosted or need to be baked longer.

Caramel Buttercream
Adapted from the Australian Women's Weekly Birthday Cake Book
Makes enough for 24 cupcakes if you spread with a knife not a piping bag!

125g butter
1 1/2 cups icing sugar (confectioners sugar)
3 tbsp caramel sauce
1 tbsp milk

Using electric blenders, beat butter until creamy.  Gradually add the icing sugar.  Then beat in the caramel sauce and milk.

On the Stereo:
Marvin the Album: Frente

Saturday 25 April 2020

Street art in Melbourne: Brunswick 2020

Today I needed to get out.  I rode my bike to Ann Street in Brunswick to look at street art.  I forgot how risky going out is - I lost a favourite sleeveless puffer jacket which I foolishly thought would fit in my bag.  There were good things too.  Kombucha (purchased across a chain at the doorway) at Rays Cafe in Victoria Street.  And lots of lovely artwork to make me laugh and sigh.  I have shared my photos of the Ann Street artwork today plus a few more from around Brunswick, mostly taken on other days!


Above and below: Davies Street, near the corner of Holmes Street.


Upfield Train Line near Hope Street

Ewing Street

Cassels Road, near corner of Moreland Road

Off Albert Street East of Sydney Road

Victoria Street 

I have shared this photo of Tinning Street silo painting of New Zealand PM, Jacinda Ardern, before but it does not hurt to be reminded of great leadership, great compassion and the power of personal touch in these strange days of Covid19.

More Brunswick Street Art on Green Gourmet Giraffe:

Wednesday 22 April 2020

Fondant Black Cats for a pre-coronial sleepover birthday party

Joni Mitchell was right when she said "You don't know what you've got 'till it's gone".  I am finally posting about Sylvia's pre-coronial birthday party, held back when we didn't know how isolated life could be.  Now we are in lockdown, I look back with nostalgia to when we took for granted that we could hold a sleepover party, sit close together exchanging presents, take group selfies, share a meal with friends, take party bags to share among all her class at school, and visit extended family for a birthday cake.  We didn't know how special that was at the the time.  Perhaps that is why I can't bear to throw out the fondant black cats we made for the sleepover party.

Sylvia chose to make the fondant black cats.  She loves her youtube tutorials and found this one by Zoes Fancy Cakes on How to make a black cat topper.  Which is why we made the cupcakes in front of a video on the ipad, constantly rewinding to check how to do it yet again.  (As an aside I am old-school and much prefer to scan text which is so much quicker than listening to the managers giving updates on videos or school teachers giving instruction on video, or even watching cat topper instructions on video.)
Despite my dislike of videos, this one did really help a heap in making our black cats.  I took a few process photos but my hands were too sticky and I had to concentrate too hard to take lots.  So I recommend the video instructions.  In a nutshell, we had to:
  • roll a column of black fondant, slightly conical,
  • mark the legs at the front with a knife or tool,
  • attach 4 blobs to be paws,
  • make claw marks on these four paw blobs,
  • stick a toothpick into the neck,
  • roll a slightly diamond shaped blob
  • press blob onto skewer to make a head, 
  • push in eye sockets,
  • shape and attach ears,
  • place a large flat black disk on front of face under the eye sockets,
  • put a small black blob on top of disk to be the nose,
  • make holes with a skewer on rest of disk, 
  • mark whiskers,
  • roll flat green discs for eyes,
  • use a black edible pen to draw black circle on eyes.
  • stick eyes onto face where eye sockets are,
  • make a tail,
  • stick tail at the back

Place each cat on top of a cupcake if you wish but with hindsight I think they were rather big for cupcakes.  But they still delighted the kids!
Maybe not our easiest project ever!  But Sylvia is 11 so we were both able to make them.  And the little cats were so cute.  A few tips:
  • Don't argue at the supermarket about buying out of date fondant as the checkout chick will just go by the rules instead of recognising that sugar never goes off and that no one actually likes eating fondant! 
  • We used a little icing sugar for the fondant but tried to minimise use of it to avoid lots of white streaks on the black.
  • Our fondant was not quite as smooth as the video but it was close enough for jazz.
  • We could not find green fondant for the eyes so we bought yellow fondant and drew on it with a green edible marker and then kneaded in the green colour.
  • We used a black edible marker to make the black pupils on the eyes rather than doing the eyes on the video.
  • We used water to stick bits of fondant together.
  • We still have the fondant cats so I recommend making them ahead of time.
  • They are a bit big for cupcake toppers and too much sugar to eat so totally useless except for entertainment and wow factor (and keeping on the kitchen bench to admire).
  • Getting the tails attached is a pain.  They fall off if you try and pick up the cats. 
  • Black cats are really hard to photograph!

The fondant cats were made in the morning before the party.  There was much to do before the 5 guests arrived at 4.  By then we had set up the lounge with folding beds.  The sofa bed was taken out later and one guest left at 8.  Another couple of kids left during the night.  So it was an interesting slumber party. I spent quite a bit of it in my room but it took quite some time for them to settle.

One of Sylvia's friends came over early to help with organising.  They were so cute when they made a green version of Sylvia's favourite punch.

We were excited to find this packet of mash ups with a mixture of Twisties, Doritos and Cheetos.  For some reason, Sylvia loves Cheetos but I am more old fashioned and love Twisties.

We tried to give some healthier snacks as well.  Vegies and hummus were offered while the girls waited for takeaway pizza for tea.

Sylvia chose some snacks to put out for later when they were watching a film.  Yes, too much and plenty leftover!

She worked on the party bags with her dad.  There were party bags for the guests.

And more lollies in the party bags to take into school for her class.

I didn't take photos of her presents but there were a lot of cats and colour in her presents.  The above coaster is pretty cute.

And here is the black cat who inspired the fondant cats, our Shadow!  He hid during the party as much as he could but the kids loves it when he showed his face.

Not long after this party, Sylvia had a sleepover on a Friday night followed by another friend's sleepover party on a Saturday night.  That was the last hurrah before lockdown made it forbidden for friends to play together.  It will be a fine day when the kids are back together.

On the stereo:
Parachutes: Coldplay

Friday 17 April 2020

Easter nut roast with mac and cheese layer

Easter this year was an odd occasion.  It is a long time since I haven't had Easter Sunday dinner with my parents.  And for my parents it was the first time since my oldest sister was born that they had a child free Easter lunch.  But CoVid19 kept my family apart.  So it was just Sylvia and me for Easter lunch.  One of her favourite meals is mac and cheese.  I offered to make it for her and then I suddenly remembered I always make a nut roast to take to parents Easter lunch.  So I incorporated the mac and cheese into my nut roast.

Sylvia and I had a screen free day on Easter Sunday because we had a lot to do to organise food and the house for Easter. Even so, the day went quickly and I ended up making this late at night.  I had decided to try making a similar nut roast to our favourite sausage rolls.  It was slightly different so use up some ricotta, reduce the eggs and add a few extras like parsley and carrot. 

I was pretty proud of myself for not going to the supermarket for 2 weeks!  So I was determined to make do.  It was made easier by making two recipes I make so often: mac and cheese (for which I didn't use a recipe but have an approximation of one below) and sausage rolls.

I was delighted with how the mac and cheese layer was quite visible and crisped around the edges.  The end pieces of nut roast were better than the middle which were a little soft and pasty.  I think I would see out another nut roast (this one or this vegan one)if I were to do it again but I did love this one.  It didn't slice fantastically because it crumbled easily but still looked impressive.  I toasted a few pieces under the grill for sandwiches.

Mostly I loved this nut roastt because it meant that Sylvia and I could share a meal we both loved at Easter.  I served mine with peas and tomato sauce.  She served hers with peas and more mac and cheese.  But I cannot complain when she ate a slice of the nut roast with no encouragement or fuss.  She even asked for more when I had leftovers!  Leftover nut roast is the best! 

We talked about how the nut roast could be changed and both of use suggested more layers.  However we realised we were not talking about the same thing.  I meant more coloured layers, perhaps coloring the mac and cheese or nut roast with things like tomato paste, turmeric and spinach.  Sylvia just meant more layers of mac and cheese! This nut roast is a good example of how to share a meal when two people want different meals.  I see more stuffed nut roasts in my future!

More Easter dinner nut roasts on Green Gourmet Giraffe:
Buckwheat and sweet potato nut roast
Carrot and feta nut roast
Cereal nut roast
Cheesy carrot nut roast
Cheesy nut roast
Pumpkin nut roast
Pumpkin, sundried tomato and basil nut roast

Mac and Cheese stuffed nut roast
Feeds 8-12

Nut roast
Adapted from Green Gourmet Giraffe

2 carrots finely grated
1 cup (125g) walnuts, finely chopped
1 cup rolled oats
1 cup dried breadcrumbs
1 medium to large onion, finely chopped
1 tsp of stock powder
1 clove of garlic, crushed
250g ricotta
2 eggs
2 tbsp tamari
2 tsp seeded mustard
1/4 cup finely chopped parsley

2 1/2 cups mac and cheese (see below recipe)

Preheat oven to 220 C and grease and line a loaf tin.  Mix all ingredients except the mac and cheese.  Spoon and smooth down half the nut roast mixture into the loaf tin.  Spread the mac and cheese over the nut roast and then carefully spread the other half of the nut roast mixture.  Smooth on top with the back of a spoon.  Bake for about 40 minutes or until golden brown on top.  I could have baked mine slightly longer but I knew I would be heating it in the oven the next day so it would bake more.
 
Mac and Cheese
Adapted from Green Gourmet Giraffe

500g macaroni
2 dessertspoons of butter
2 dessertspoons of wholemeal (plain) flour
2 cups milk (I use soy)
1 tsp seeded mustard
1 tsp apple cider vinegar
165g vintage cheddar cheese, grated
50g mersey valley vintage club cheddar cheese, grated
seasoning

Melt butter in a medium saucepan or large frypan over low heat. Mix in flour and stir over low heat for 1-2 minutes until it smells cooked. Add milk gradually, mixing as you add it. Bring to the boil so that the roux thickens slightly. It does not need to be really thick because the cheese will help it thicken. Add mustard, vinegar and cheeses.  Check and adjust seasoning.  Stir in cooked pasta.

NOTES: I used cold mac and cheese - it make bake a bit quicker with warm mac and cheese if you had just made it.  This could be made vegan with a vegan nut roast and a vegan mac and cheese.

On the stereo:
The Best of REM

Sunday 12 April 2020

Easter Fridge Cake with Meringues

Happy Easter.  We've been baking up a storm as though we were going to a large family gathering instead of being in CoVid19 lockdown.  I would like to claim to be "quarantoned" rather than accumulating CoVid19 kilos but I am an expert at comfort eating.  And Easter and comfort scream "chocolate".  I was reminded of an easy fridge cake we made a few Easters ago in the UK soon after my father in law died.  It is a cake for stressful times.  So Sylvia and I had great fun making it this Easter.

As I said I have been baking.  I made a chocolate babka last week (which I hope to post soon).  It used 2 egg yolks so we had 2 egg whites to use up.  Sylvia jumped at the chance to make meringues.  We thought it would be a nice addition to the Easter cake.

As a digital native Sylvia wants fancy multi coloured meringues.  She has seen them on YouTube and so she knows exactly what to do.  She showed me how to make "sausages" of coloured lines of meringues.  I was slightly worried that too much handling with mixing in colour would take the air out.  But they had great shape and we loved the colours.  (Better in real life than in the photos!)

When we made the Easter Caramel and Malteser Fridge Cake in Scotland we had digestives and maltesers.  Here back in Melbourne we decided to use local Tim Tams.  Then, when we found we had forgotten the Maltesers, I was not about to go back to supermarket where I had not been for about 1 and 1/2 weeks.  We made do with salted pretzels.  I wonder if we should have chopped them so they weren't so chunky.  I really liked the pretzels but the Tim Tams were so chocolatey that they disappeared into the mixture a bit.  The chocolate covered raspberry (jubes) were really good.

The most fun of this cake (and we use the word "cake" loosely) was decorating it with lots of Easter Eggs.  We added some meringues because we had them.  Sylvia had also made the Easter egg with the mini-freckles (sprinkles) over it.  The bunny peering out from the eggs amuses me.  It makes me think of the politicians who helpfully announced that the Easter Bunny is an essential worker in the lockdown.

Many of us have Easter traditions that we miss.  In my family, my dad always organises an Easter Egg hunt for the grandkids.  So this year he organised a virtual egg hunt.  He emailed their parents a list of places to  hide eggs and last night we held a Zoom conferences where he gave clues and each kid went off to find the eggs.  It was as chaotic as a egg hunt in his garden but at least there were no eggs that we couldn't find!  And my nephew from Ireland was able to participate which he would not normally when we are in the garden!

This morning, Sylvia hadn't had enough of egg hunts so I did one for her in the backyard and she did one for me.  I think we both had lots of fun working out places to hide the eggs in our little yard.

We took out a tablecloth and found some flowers in the garden.  I made mac and cheese for Sylvia and stuffed some of it into a nut roast (but that is for another post).  It felt good to be formal, even without more family about.  Sylvia even made some lime cordial with fancy garnishes of lemon, mint and ice.  The Easter cake was ridiculously sweet but nice in small slices.

In the afternoon, I put out some hard rubbish and chatted to neighbours who were doing the same.  It is such a strange Easter.  I just hope that by Christmas we are able to celebrate with friends and family again, but nothing is guaranteed right now!  I hope you have enjoyed today, been able to celebrate if that is your thing or been able to find something to keep your spirits up in isolation!

More Easter food on Green Gourmet Giraffe:
Easter Caramel and Malteser Fridge Cake
Easter egg pizza
Leftover Easter egg slice
Marzipan Easter egg cupcakes 
Overnight Sourdough Hot Cross Buns (v)
And more links at this Easter recipes round up

Multicoloured Meringues
Adapted from taste.com.au
Makes about 3 dozen

4 egg whites
1 pinch salt
1 1/4 cups of icing sugar  (or 1 cup castor sugar)
1/2 tsp vanilla
food colouring, optional

Preheat oven to 120 C.  Line two baking trays with baking paper.

Using electric beaters, beat egg whites with salt until til soft peaks form.  Beat in sugar, a spoonful at a time until it is dissolved.  Add vanilla and continue to beat for 3 minutes until stiff peaks form.

To make the meringues multicoloured, spoon egg white mixture into a few bowls and mix colouring into each very gently with a skewer or knife.  Use a spoon to spread a line of one colour along the middle of a square of clingfilm on the table.  Spread another line of the next colour.  Repeat if you want more colours.  Roll up gently like a sausage in the clingfilm with a slight opening (or twist at each end and then snip an opening with scissors at one end).

Carefully lower "sausage" into a piping bag with opening towards nozzle.  Pipe meringues onto prepared trays and bake for 1 and a half hours (we turned halfway through because my oven does not bake evenly).

Easter fridge cake - the Aussie edition
Adapted from Green Gourmet Giraffe
Serves a crowd

250g caramel milk chocolate
225g milk chocolate chips
125g butter
3 dessertspoons golden syrup (I forgot)
150g tim tam biscuits, chopped
100g chocolate covered raspberry jubes
50g bar cherry ripe, chopped
2 cups salted pretzels

Chocolate drizzle:
100g milk chocolate
3 dessertspoons milk

To decorate:
Large Easter egg
Assortment of medium Easter Eggs
Mini Easter Eggs
Other bits and pieces such as meringues, chocolate bunnies and lollies

Place a bowl in a large cake tin (I think I used a 22cm round one).  Line with foil or gladwrap and spray with oil (or grease with butter).  Mix caramel chocolate, choc chips, butter and golden syrup in microwave or in a saucepan.  (I prefer the microwave as it heats it at a lower temperature.)  Stir in tim tams, raspberries, cherry ripe and pretzels.  Press evenly into prepared tin.  Chill in fridge a few hours until firm.  Turn out onto a plate.  Melt chocolate with milk to make drizzle.  Use a spoon to drizzle over the ring.  Place large egg in the middle of the hole in the middle and arrange medium eggs and bunnies, then mini eggs and other decorative bits and pieces. 

On the Stereo:
Music from the Gilmore Girls: Various Artists