Saturday, 16 July 2011

Easey Cheesey Scones

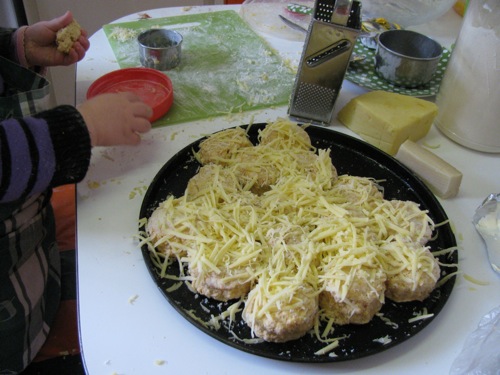
It is a day for enjoying the winter sunshine.  A day to hang the washing outside.  A day for walking down the street, with our little white cat in tow, discussing shadows.  A day for sitting on the swing in the neighbour's front yard.  A day for baking scones in a warm kitchen.  We original planned to make pumpkin scones.  There wasn't enough mashed pumpkin the fridge.  Instead we made cheese scones.

I found a simple cheese scone recipe from Lovely Wee Days that I had bookmarked.  Then I discovered we had no milk.  I turned to the ingenius idea I got from AOF to substitute soda water for milk.  I also had mixed the mashed pumpkin with some cream cheese so I threw some of that in as well.  I let Sylvia sprinkle the smoked paprika in.  It was a generous amount.  Kids are never subtle.

When I suggested cheese scones to Sylvia, she gave me her funny little nod of approval.  She was up to her elbows in the mixture and helped cutting out scones.  Yet when they came out of the oven she wasn't interested in them.  Maybe she ate too much cheese while we baked.

Both E and I loved the scones.  They were best once given a 10-15 minutes to cool down.  We had them with various combinations of butter, promite and the pumpkin-cream cheese mixture.  I found them terribly moreish.  Hard to stop at one.  Easy to just keep eating them.  Soft and cheesey inside.  Crispy cheese on the outside.  Not for the calorie- conscious.  Perfect for any cheese-lover.  Great with soup or for a simple lunch

I am sending this to the Bookmarked Recipe event that is hosted by Jacqueline from Tinned Tomatoes and was founded by Ruth from Ruth's Kitchen Experiments.

Previously on Green Gourmet Giraffe:
This time last year: Fish and chips – reflections of a vegetarian
This time two years ago: Pear and Walnut Chutney
This time three years ago: Tagged: Top Ten Photos
This time four years ago: Dench bread and Dukkah: simple pleasures

Cheese scones
adapted from Lovely Wee Days
  • 2 cups grated cheddar cheese (not packed)
  • 1/2 cup grated parmesan cheese (not packed)
  • 2 cups self raising flour (I used half white, half wholemeal)
  • generous sprinkle of smoked paprika
  • 1 cup soda water (or milk)
  • 1/4 cup mashed pumpkin and cream cheese (or milk)
  • extra grated cheese for sprinkling

Preheat oven to 240 C.  Mix grated cheddar and parmesan cheeses with flour.  Gently stir in soda water and pumpkin and creamed cheese mixture until the dough comes together in a soft ball.  Mine was really sticky and needed a bit of flour sprinkled on it so I could handle it.

Turn out onto a floured board and knead a couple of times until smooth.  Pat flat on a floured board until about 1cm thick (or a bit thicker).  Cut into rounds and place almost touching on a greased baking tray.  Sprinkle with grated cheese (I used parmesan and cheddar again).

Bake for 15-20 minutes.  Mine were still a little doughy after 15 minutes but a few more minutes helped.  Wrap scones in a teatowel.  Best eaten warm.

On the stereo:
With my Little Ukulele in my Hands: I'm the Ukulele Man: George Formby

Friday, 15 July 2011

Paula's Carob Bikkies

I almost got this post up on Wednesday.  I didn't have any energy left last night.  Today I am determined not to let life get in the way of blogging!  This week has been full of getting a work project up and running, Sylvia crying in the night, planning for a holiday in a little over a week, cursing my computer for falling on my card reader (that downloads photos onto my computer) and schlepping a table and chairs through Ikea carpark while Sylvia sat in the road and cried.

The trouble with delaying posting a recipe is that every time I sit down to it I have different thoughts to to share.  Today I want to tell you that a stroller has the power to stop escalators.  Yesterday I wanted to tell you that Sylvia loves her new table and chairs so much that she has told me she will no longer be eating at the table with us.  But earlier in the week I started writing about sacrifice and kids.  This is my best thought out train of thought so I will follow it.

I heard someone recently say that it is no sacrifice to have children.  I understand.  "Sacrifice" makes children sound like they are a burden.  Yet having children does mean giving up.  I have childless friends who do a lot more travel and eating out than me.  They seem to have more freedom to uproot and change jobs or town.  Saying that having children is no sacrifice suggests we can have it all.  We can't.  Life is about choices, about decisions, about the road not taken. 

Having children means filling the house with their paraphernalia, taking 25 minutes to walk a couple of blocks, standing in the supermarket with a crying child.  This week when I got the car serviced, Sylvia crawled across the garage floor where the mechanics work.  You wouldn't want to see her knees after that!  I had to laugh.  It is all about perspective.  Our house is crowded with Dolly's pram, highchair, cot, supermarket trolley, pens, playdough, lego, dollies etc.  It might horrify some who value a spotless house but it fills the place with color and life.  Walking so slowing along the road is frustrating but it also makes me take time to chat to Sylvia, notice my surroundings and smile at old ladies who think Sylvia is a doll.  Even having a crying child reminds me that I am the one she turns to when she is upset.  Having children is a sacrifice.  Yet is it a sacrifice worth making.

Maybe it would be better to say having children means change.  Huge change.  Evenings disappear in a haze of eat-your-dinner, baths, stories and songs.  I spend more time at the park and less on my bike.  Even the food I prepare has changed.

It is very odd to be responsible for the food of someone who has different tastes.  I've never cooked eggs in my life because I don't like them.  Recently Sylvia has developed a love of boiled eggs.  Preparing boiling eggs has never been a basic skill for me.  Now I am learning how to get the yolk hard for Sylvia.  I am no fan of carob but Sylvia seems to like it.  She took a shine to my neighbour's gluten free carob cookies so I asked for the recipe.  So you can thank Paula for the post but don't blame her for all my waffle!
 
We took the cookies on a trip to Scienceworks a few weeks back.  I was ignorant of a huge new dinosaurs exhibition that had recently opened.  We stood in the long line for about 5 minutes.  It hardly moved so we left.  (If only we had bought online tickets we could have walked straight in.)  When we had set out, all Sylvia had wanted was to go to the park.  We were travelling by train so we stopped at North Melbourne station, watched some trains, went to the park and then had lunch at a cafe.  Sylvia was delighted. 

At the cafe I was reminded about our similarities and differences.  I can understand that she doesn't think ice cream is the bees knees.  I don't get her enjoyment of eating a plain pancakes and ignoring the icecream and berries that were specially served on the side for her.  The cafe was Tramezzini but it sometimes feels unfair to write up a visit separately when it is so coloured by my experience with Sylvia.  I can say that the staff were friendly and my Croque Mademoiselle of leek, mushrooms and gruyere on toast was quite good.

When eating out, Sylvia turns into a carbitarian.  I often try to balance these stodgy foods with food that broaden her intake of nutrients.  So I was quite pleased that she had one or two of these carob bikkies as well as her pancake.  Not only do the biscuits have carob but also a lot of quinoa flour, which is a complete protein. 

The biscuits are easy to make and if they are only made for one (as in Sylvia's case), they are easy to pop some in the freezer and slice up a few to bake every now and again.  Neither E nor myself gets very excited about them but Sylvia loves them.  They are not overly sweet and have some  health benefits so I don't get too concerned about her eating them.  In fact I am sending them to Amy from Simply Sugar and Gluten Free who holds a weekly event called Slightly Indulgent Tuesdays.

Lastly I wanted to return to the ideas of choice that I touched on with discussing children and sacrifice.  Sylvia has become a lot fussier about eating her vegetables (and often her dinner altogether).  Sometimes she will want a biscuit so I tell her that she can have a bikkie if she eats her broccoli (or tomato or carrot or sausage etc).  I don't insist she cleans her plate completely but I do say she has to have some of her vegies.  Occasionally I worry I am falling into the bad habit of bribing that I have read about.  However on my better days I think this is a way to teach her that life is about making choices.  After all if she can insist we listen to the Moody Blues, surely I can ask something of her too!

Previously on Green Gourmet Giraffe:
This time last year: Nutella Blondies
This time two years ago: SHF Apricot sponge – by any other name
This time three years ago: Pumpkin soup and history
This time four years ago: Isa's Pizza - from disaster to delicious

Paula's Carob Biscuits
makes about 3 dozen

3 eggs
1/4 cup canola oil
1/2 - 1 cup sugar (I used 1 cup coconut sugar)
1/2 tsp vanilla extract (or 1 tsp vanilla essence)
1/2 cup carob powder (or a bit less)
2 cups quinoa flour (Paula used 3-4 cups)
1/2 cup rice flour (Paula didn't use this)

Put ingredients into a mixing bowl, mixing after each addition.  I took Paula's advice and added the flour gradually and stopped when I had a stiff dough.  She says hers is so stiff she can hardly stir it but I stopped when it came into a firm ball.

Roll dough into a log about 1 foot long and 8cm in diameter.  Cut slices of about 0.5cm - or a bit thinner if you like them crispy.  (Thicker are more moist.)  Paula says it is easier to cut them once they have been in the freezer but I didn't find them too difficult when room temperature., though it is useful to cook only a few at a time.  To freeze the dough, wrap log in baking paper and secure each end using a rubber band.  Biscuits can be cut and cooked with frozen dough (ie you do not need to bring it to room temperature).

Bake at 200g for about 10 minutes.  They will look dry when cooked but there isn't too much to give away if they are cooked because the dough is so dark but I don't think it matters too much as long as you don't leave them in too long.  Cool on the tray or on a wire rack.

On the Stereo:
The Bestiality of - The bonzo dog doo-dah band

Sunday, 10 July 2011

Mulled wine and chocolate cake

Once upon a time in a city far far away I had a wicked manager who was a bully.  She was nasty, moody and made all her staff very miserable.  Fortunately, within a few months I was rescued by a fairy godmother manager who appointed me to a position in her section.  The wicked manager stamped her foot furiously like Rumpelstiltskin, though sadly she did not disappear through the floor.  My fairy godmother manager was very good to me and among her gifts was a recipe for mulled wine from her Viking heritage.

Actually Marianne was Swedish.  The city was Edinburgh: a place that appreciates mulled wine.  It seems like warmed spicy alcoholic beverages are much appreciated in its pubs and of course at the German Christmas Markets.  Great for the festive season if you live in the northern hemisphere.  It is also the perfect drink to keep out the winter cold. 

The beauty of Marianne's recipe is that you don't have to worry about boiling off the alcohol.  You bring sugar, orange, spices and water to the boil, turn off the heat, add the booze and leave overnight.  I have made it this way many times and highly recommend it.

When I made it recently, I made it a more traditional way by cooking it on low for 10-15 minutes.  It was the night that Yaz was visiting so I couldn't leave it overnight.  I was pleased to find it worked well that way too.  It was a fine accompaniment to the Orange, Lavender and Almond Cake that we made.

It doesn't need fancy alcohol.  This is not the time to buy one of those cheap wines with amusing names (such as "Scrapping the bottom of the barrell") that have always made you giggle and feel a tad suspicious in the bottle shop.  E's cheap wine of choice is a $5 bottle of what is known in our house as Chateau Crittenden.

As well as a cheap bottle of plonk, I had a bottle of spiced mead on hand.  In the past I have used port which I used to have around.  These days I don't drink as much and found the mead worked as well as the port to bring an intensity to the spicy warmth of the drink.  Anything will do - brandy, cointrea, muscat - whatever you have in the liquor cabinet.

We are not big drinkers.  In the past we have often not got through a whole batch of this mulled wine.  It will keep in the fridge for a few days.  You can even store it in the empty wine bottle if you can find where your funnel is.  (Where mine went is still a mystery!)  We were gradually making our way through it.  Then I had a brilliant idea.  Not only was there leftover mulled wine but also leftover orange syrup from the cake.

Many moons ago, I promised myself I would make Cindy's Red Wine Chocolate Cake.  A bit of orange and spice are always good additions to a chocolate cake.  So in went the mulled wine and the orange syrup one night between baking bread and watching Downton Abbey.  It didn't quite cook in the middle and it was a bit fluffy for my liking when it came out of the oven.  After a few days it was deliciiously firm and chocolatey.  I was quite sad to see the end of it.

I had a notion to take a photo of the cake with Sylvia's babushka dolls to signfiy the idea of a recipe within a recipe.  Sylvia had a notion to play with them so the above is the best I could do before she grabbed them all and I had to get ready for work.  That sort of signifies how I feel today.  I have plans for posts I would like to write, for ways of organising my house, for recipes to make and yet my energy and time is quite limited.  If only life was as easy as curling up with a cup of mulled wine and a piece of cake.

Previously on Green Gourmet Giraffe:
This time last year: Rhubarb and apple sponge pudding
This time two years ago: Sour Skon
This time three years ago: Miss Marple’s Tea Room – cosy charm
This time four years ago: Mexicale Pie - an old favourite

Mulled wine
From Marianne

150g sugar
350ml water
3-4 oranges
5-6 cloves
2 cinnamon sticks
750ml red wine (doesn't have to be good quality)
60-80ml port or other fortified wine (mead worked well)

Stick cloves into oranges.  Place sugar, water, oranges and cinnamon sticks in large saucepan and bring to the boil.  Add wine and port.  Either leave for 12-24 hours or Heat on lowest setting on stove for 10-15 minutes - there will be a bit of steam but no boiling.  Serve warm.  We never drink it all in a night so it sits in the fridge for a few days and gets reheated as desired.

Spicy chocolate cake
Adapted from Where's the Beef?

250g butter
250g castor sugar (I used 1/2 cup - about 125g)
4 eggs
250ml red wine (I used one third orange syrup, two thirds mulled wine)
250g self-raising flour
3 dessertspoons cocoa
1 teaspoon baking powder
1 teaspoon cinnamon
150g dark chocolate, finely chopped

Preheat the oven to 170 deg C. Grease and line a 22cm spring form tin (springform isn't necessary but that is what I have).  Cream the butter and sugar (I did this by hand). Mix in the eggs and wine. Mull over the colour and whether it takes on the red hue of the wine.  Gently stir in the flour, cocoa, baking powder and cinnamon.  Stir in the chocolate.  Spoon the batter into the prepared cake tin.  Bake for about an hour or until cooked.  I am not sure how you check this. I found mine was best after sitting in an airtight container for a day or two.

On the Stereo:
Jazz for Dining: Various Artists

Friday, 8 July 2011

Cookie wands

On the weekend I had great fun helping my nieces make cookie wands at Maddy's birthday.  I offered to make these wands rather than a cake because it seemed a better way for the kids to get involved.  I expected the kids to enjoy it, but I was surprised how much the adults got into the decorating when offered the chance.

The idea for the cookie wands came from Barbara at Winos and Foodies.  I checked with my sister Susie and my niece Maddy who liked the idea.  Then my mum and I made plans.  She bought ribbon and I bought lollypop sticks and sprinkles (from Cake Deco).  On the morning of the birthday lunch, just a small family gathering, mum and I made the biscuit dough.  We made a batch of regular dough and a batch of gluten free dough.

We took the dough to Susie's house.  Surprisingly the gluten free dough was much easier to handle than the regular dough.  The gluten free dough would have been happy not to have been chilled at all.  The regular dough was quite soft and needed lots of chilling and extra flour.  We baked them with the sticks on and let them cool while we ate the birthday lunch.

Susie and mum had made delicious food for lunch.  Mum made regular and vegetarian sausage rolls (with my usual sausage roll filling), Masterchef's Caramelised Leek, Goats Cheese and Sage Tart (with a gf pastry option) and Donna Hay's Cocoa Brownies (with gf flour).  Susie prepared dip with crudites and crackers, hotdogs in rolls, a grapefruit juice and lemonade punch with pineapple juice ice cubes, and a platter of fruit and marshmallows.

Meanwhile, Maddy and I worked on setting up the stations (with help from Grace).  We cut up ribbons for the ribbon station.  We got out the sprinkles for the decorating station.  Finally I mixed the icing.  Our plan was that each child would choose two ribbons to tie around the stick, then I would ice the star and the child would decorate the wand with their choice of coloured sprinkles.  Of course it was more chaotic than that. 

Once the kids had finished their turn, we invited the adults to decorate a wand.  Wary at first - they just don't have the easy enthusiasm of the kids - they all joined in eventually.  Quin helped to decorate a few extra gf bikkies without sticks.  Everyone had fun.

The wands looked gorgeous and colourful.  Next time I would colour the icing rather than just using plain old white.  I didn't do the piping around the edges like the Kids Cakes book suggested.  As an aside I found some of the terminology alien to me - "pastry cones", "half sheet pans" and "sanding sugar".  I am not sure if that is due to my lack of decorating prowess or my living over the other side of the world from the author.

We all agreed that this was a great idea for a party.  After the palaver with the dough, my mum and I thought it would be a bit easier to bake the wands before the party.  Kids could decorate a wand each and take them home at the end of the party rather than a lolly bag.  These are the sort of biscuits (or cookies) that don't taste that interesting to me but they are fun to decorate and play with.

It occurs to me that it would be a great team building exercise.  I much prefer to be doing something with my hands than having to make small talk with strangers.  One of my favourite conference activities was decorating clap sticks.  It was relaxing to be doing something and just chatting when we felt like it.  I much prefer this sort of activity than paintballing or getting drunk in a pub.  Sadly it is not everyone's cuppa tea.

Sylvia is really into birthday parties and was very interested when I told her we were going to make cookie wands for Maddy's birthday.  She asked if we were going to put cookie wands on the birthday cake.  A great idea.  Though she would probably want to set them alight and blow them out!

Previously on Green Gourmet Giraffe:
This time last year: Falafel for E, Pizza for Sylvia
This time two years ago: Breakfast Burritos – My Way!
This time three years ago: Curious Chipotles and Bonza Burritos
This time four years ago: Peanut Butter Brownies

Sugar Cookies
Adapted from Kids' Cakes from the Whimsical Bakehouse: And Other Treats for Colorful Celebrations
Makes approximately 24 to 30 wands (I don't think we got so many)

125g unsalted butter
2/3 cup sugar (I think we used about half of this)
1 egg
½ tsp vanilla extract
1-½ cups plus 2 tablespoons plain flour
½ teaspoon baking powder
½ teaspoon kosher salt

Cream butter and sugar.  Add the egg and vanilla and mix until creamy.  Add the dry ingredients to the bowl and mix until the dough comes together into a ball.  My mum did this by hand but the dough was quite soft so she said she would find it easier to do this in the food processor and could have added a little extra flour and made it more manageable for rolling out.

Wrap ball of dough in clingwrap.  Chill in the fridge for 30 minutes (we did 15 minutes in the freezer).  Roll the chilled dough out to between two sheets of baking powder to between 0.5 and 1cm thick (ideally it would be 0.5cm but as we needed to get lollypop sticks in, it was easier to have it a bit thicker).   Mum needed quite a bit of flour to roll out the flour because it was so soft, even after chilling.  Return rolled sheet of dough to the fridge for about 30 minutes.

Cut the chilled rolled dough into stars using a star shaped cutter.  Transfer to a lined baking tray.  Push lollypop sticks into stars.  It should go in at least halfway through the stars.  I actually picked up each wand to check the star wouldn't fall off the wand when held upright.  Arrange wands on a tray so they are well spaced.  Alternately you can cut into any shape you wish.  Bake at 180 C (350 F) for 10-15 minutes (I will check about the time). 

Cool on a rack before checking that the wands can be held upright.  Decorate with icing and sprinkles.  The book suggests when decorating that you hold the cookies when rather than the sticks to stop them collapsing.

GF Sugar Cookies
Adapted from Louise Blair's Great Gluten Free Baking
Makes about 10-15 cookies

200g brown rice flour
1/2 tsp xanthum gum (we used some gluten substitute instead)
1 tsp baking powder
50g brown sugar
50g butter
1 egg
1/2 tsp vanilla essence
2 tbsp golden syrup

In a food processor, mix dry ingredients.  Add butter (cold from fridge) and process until the mixture resembles fine breadcrumbs.  Mix in remaining ingredients in the food processor until a ball is formed.  You can use straight away or keep in the fridge wrapped in clingwrap until you need it.

Roll out until about between 0.5 and 1cm thick, using a little gf flour.  Cut out using a star cutter (to make wands) or cookie cutter of your choice.  Place on a baking tray lined with baking paper.  Make sure there is a little space between them.  To make cookie wands, carefully push a lollypop stick into each star.

Bake 10-15 minutes at 180 C oven until a very light golden (I will check about this).  Decorate as above.

On the Stereo:
Ultra Lounge vol 1: Mondo Exotica: Various Artists

Tuesday, 5 July 2011

Olive oil bread and calzone

A recipe for a good simple loaf of bread is hard to find.  I am sure there are many out there.  That is the problem.  Which one to choose?  It is a veritable tyranny of choice out there!  Simple should be easy.  Yet I fear dull, dry and dreary when it comes to simple breads.  Recipes need to inspire.  I need a source I can trust.  Enter Brydie's step by step guide to making olive oil bread.  Having made four batches of this bread over the last month, I can highly recommend it.

I have made it in the evening when we haven't managed to get out and buy a loaf of bread.  What I love about this bread is it uses ingredients I have on hand and it is works in with my lifestyle.  I have tried adding wholemeal flour.  I have left it rising while I go to the supermarket and get chatting to a friends.  I have paused to photograph the salt hog because my new celtic sea salt reminded me of the sand on the beach and then I have forgotten how much salt I put in.  I have made it with canola oil rather than olive oil.  I have tried making it using the sponge method that Mollie Katzen favours.  I have made it between Sylvia's bath and Downton Abbey on the telly.

I make it in my bread tin.  It comes out with a gorgeous golden brown crust.  It looks just like a regular loaf of bread we might buy from our local bakers.  It slices easily.  It makes excellent toast.  It keeps well for a few days.  It is a joy to wake up to a fresh loaf.  The recipe is adapted from The Bourke Street Bakery cookbook.  I was interested to find another adaption of the same recipe for Parmesan Breadsticks where they say that the recipe works fine with regular flour.

Brydie recommends using this dough in a variety of ways.  I love her fish bread.  I want to make the sunflower bread that first drew me to her blog.  My first variation was taking her advice that the dough makes excellent calzones. I needed a loaf of bread and I needed dinner.  So I made two batches of dough.  I used a Jamie Oliver vegetarian calzone recipe to inspire me for the filling.

I was a bit unsure how to prepare the calzones.  Pinching it together to seal it was quite different from making pasties.  Bread dough is far more robust and flexible than pastry.  The calzones were huge.  E and I enjoyed ours.  I ate another one for lunch over two days and  still have one in the freezer.  Sylvia had a plainer one with just mozzarella and didn't eat heaps but maybe a small amount was enough for her.  Definitely something with which I would like to experiment further.

It has been a while since I posted any bread recipes but with the winter chill settling in, 'tis the season for bread baking.  I am sending this bread to Susan's YeastSpotting weekly event.

Previously on Green Gourmet Giraffe:
This time last year: Japanese-style pumpkin soup for busy days
This time two years ago: Slideshows, Nostalgia and Hedgehog
This time three years ago: Pumpkin Pancakes on Parade
This time four years ago: PPN#19: You say tuna, I say tempeh!

Olive oil bread
From CityHippyFarmGirl (adapted by Brydie from Bourke Street Bakery

600g plain flour*
2 tsp dried yeast
1/2 tsp sugar (optional if you want to feed the yeast)
400mls lukewarm water
3 tbsp olive oil
2 tsp salt
extra flour for kneading

1. Put yeast, sugar (if using) warm water and the flour* in a large mixing bowl.  Leave for 10 minutes.  It will be a dry shaggy mess if you add all the flour at this point but don't worry.

* I have tried a few different ways with flour.  It works with one third or a half wholemeal flour (and a few teaspoons of gluten flour if it is not bread flour).  I have made one batch with just a handful of flour for the first 10 minutes and added the rest of the flour after that time.

2. At the end of the 10 minutes add olive oil and salt, and the rest of the flour if you didn't add it all at the start.  Stir to combine as much as possible.  It is a not easy to add the oil and salt (and much easier if you hold back some flour to add at this point) but once you start kneading, it is fine if you haven't completely mixed it it.

Tip dough onto lightly floured board and knead until soft with an ear lobe consistency.  This dough doesn't need much flour, just a light dusting every now and again while you knead.  I kneaded it for 10 minutes the first few times but then I thought it was coming together within a few minutes and found that 5 minutes was fine.

3. Scrape any loose bits of dough out of the mixing bowl with your hands and place the dough in the bowl.  Cover with a damp teatowel.  Let rise for about 30 minutes or until doubled in size.  I have left this to rise for over an hour and it seems to be ok.

4. At this point Brydie folds it but I am not so good at folding dough and have often being hurrying so I might make a half hearted attempt to fold it a couple of time.  Mostly I just knead it for about a minute.  Return it to the bowl covered with the damp teatowel and rise another 30 minutes or until doubled in size.

5. Knead about a minute and either place on a greased tray or place in a greased bread tin.  I do the latter (my bread tin in 25cm x 9cm and about 10cm high).  I cut it in half, roughly knead each half into a neat ball and then press the two halves of the dough into the tray so they are about even in the tin.  Cover with the damp teatowel and leave to rise about two thirds.  Mine gets to about an inch from the top of the tin but rises to the top once baked.

6. While the dough is rising, preheat the oven to 240 C.  Brydie suggests steam in the oven so I have taken to filling a loaf tin (not a shallow tin) with water and placing it in the bottom of the oven, preferably when the oven is cold.  Bake bread for about 25 minutes or until dough is a deep golden brown and hollow when knocked.  The crust might seem quite crusty when it is first out of the oven but once it cools it will just be lovely and soft.

7. Tip loaf out of tin (or off the tray) and cool on a wire rack.  Leave for at least an hour and more if possible before cutting the first slice.  Lasts well for a few days but by then it is usually finished.

Mushroom and Spinach Calzone
adapted from Jamie Oliver
makes 4 large calzones

1 x olive oil dough recipe (prepared to stage 4 above)
flour, for dusting
olive oil

1 onion
500g mixed mushrooms (I used button mushrooms), sliced
4 cloves of garlic, peeled and finely sliced
1 tsp fresh thyme leaves

pinch salt
freshly ground black pepper
300ml passata (pureed tomatoes)

70g pitted black olives, chopped
300g spinach leaves, washed and spun dry
185g mozzarella, diced

Cook onion in a little oil for about 5-10 minutes until lightly browned.  In a separate large frypan, cook the mushrooms in olive oil on high heat until starting to brown and smelling marvellous.  Add cooked onions, garlic, thyme leaves and salt and pepper.  Cook a few minutes then pour in passata and sprinkle with olives.  Gently simmer until a lot of the tomato sauce is absorbed.  I think I did this for about 15 minutes or maybe more.  Stir from time to time while it cooks.  Add spinach leaves until wilted (I did this in two batches.

To assemble, cut the dough into four pieces and lightly knead each piece.  Roll each piece out on a lightly floured board (I think about 20cm diameter).  I used my hands and a rolling pin.  Spoon about a quarter of the mixture onto one side of each round of dough.  Fold dough over filling and pinch at edges to seal.  Place on greased trays.

Bake at 240 C for 15 minutes or until dough is nicely browned and sounds hollow when tapped on.

On the Stereo:
Retrospectacle: the Supertramp Anthology

Sunday, 3 July 2011

CC Orange, Lavender and Almond Syrup Cake

The past week has been full of catching up with old friends, eating out, visiting the cinema, a birthday and lots of good food.  I have much to share but today I will start with the best orange cake I have ever made, and possible ever eaten.  I've never been a huge fan of orange cake but this one was just amazing.

This was no ordinary orange cake.  It was an Orange, Lavender and Almond Syrup Cake from The Modern Vegetarian by Maria Elia.  The author is a chef and many of the recipes are too fussy for everyday cooking but they are full of innovative and inspirational ideas, as well as beautiful photos.

This cake is not the sort I usually make.  I tend to avoid syrup cakes because they seem full of citrus juice which is often too sour for my liking.  Yet I loved the picture of the cake in the cookbook with the glazed lavender scattered over the top.  (I have been asked where I got my lavender - I bought it at a food fair but it came from Warratina Lavender Farm.)

I also was intrigued by the addition of lavender.  I have had a packet of dried lavender in my pantry for about a year but just not got around to using it.  I was a little wary after I tried the lavender honey that I bought at the same time.  It tasted like I had smeared medicine on toast.  Far too herbal.  Possibly it was not meant to be eaten on toast.

Fortunately I made the syrup cake with my friend Yaz who was visiting from Hong Kong.  I was worried that we had a cake that had so much syrup it would just be a soggy mess.  Yaz had more experience, or at least faith in the theory of syrup cakes.  See the photo above of the syrup.  I thought it would never soak through but it did and then we ladled more over the cake.  How bizarre!

The lavender tended to go to the outside of the cake where most of the syrup was soaking in but it was as pretty as the photo in the book promised.  The cake tasted amazing.  It was full of sweet orange flavour with a dense moist crumb.  My concerns about the lavender overwhelming the taste were unfounded.  It merely added a subtle floral flavour.

We had our cake with the reserved syrup and honeyed yoghurt.  It seemed appropriate given that we were serving it for dessert.  We ate it accompanied by mugs of mulled wine, sitting on the rug in front of Bagpuss.  Sylvia refused to have a piece of cake but stood by my plate and scooped out chunks with her little chubby fingers.  I sent Yaz off with cake.  I had cake for morning tea at work.  I took it down to my parents' place on the weekend. However, I preferred it without the syrup and yoghurt. After the first piece, I ate it plain.

I highly recommend this cake and am happy to share it further because this is my contribution to this fortnight's Cookbook Challenge.  The theme is dessert.  To see what else my colleagues have made go here.

Previously on Green Gourmet Giraffe:
This time last year: Lemon Slice and some Nostalgia
This time two years ago: A Tale of Carrot and Feta Dip
This time three years ago: Sparkles the Rabbit Cake
This time four years ago: The Worcestershire Sauce Puzzle

Orange, Lavender and Almond Syrup Cake
From Maria Elia's Modern Vegetarian

250g butter
200g (little less than a cup) of sugar
4 eggs
50g (1/3 cup) plain flour
2 tsp baking powder
juice and zest of 2 oranges
250g semolina
200g (2 cups) ground almonds
120g Greek yoghurt

Syrup:
zest and juice of 4 orange
8 tsp dried lavender
750ml water
2 cinnamon sticks
560g sugar

Preheat the oven to 170 C (325 F) and grease and line a 20cm springform cake tin.

Cream the butter and sugar. Add the eggs (we did this by hand and it curdled). Add flour, baking powder, semolina, ground almonds, and orange zest. Add the orange juice and almonds to make a stiff batter. Spoon into the prepared cake tin. Bake for 1 hour or until a skewer inserted in the middle comes out cleanly.

While the cake is baking, make the syrup by placing all the ingredients in a medium saucepan and bring to the boil. Simmer for about 20 minutes or until syrupy. (NB I am not that familiar with syrups and after 20 minutes it was not that syrupy but the cake had already been out of the oven for 20 minutes so we just used it.)

Remove cake from the oven and pierce all over with a skewer - this is great for getting out any frustrations you might have! Pour half the hot syrup over the warm cake. Cool cake to room temperature.

We then simmer the syrup while the cake cooked so the syrup was quite thick. We served the cake with the syrup and a honeyed yoghurt but I preferred the cake without the syrup and the yoghurt. Our cake lasted 4 days.

On the stereo:
Elton John's Greatest Hits

Wednesday, 29 June 2011

Smoky Lime Chickpeas

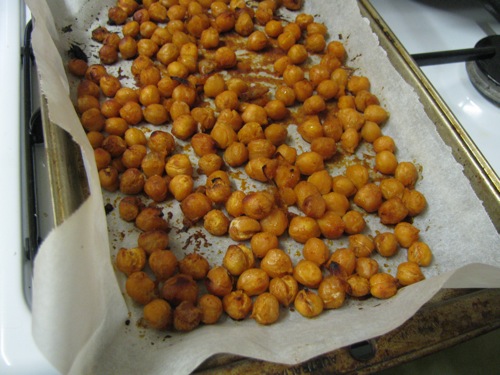
It's been a busy day.  Lots of cooking and baking and good food shared with a friend.  I'll share them with you soon.  Today I have a quick post on some snacks I made last night to nibble before dinner.  Smoky lime chickpeas, based on Susan's Chipotle Lime Peanuts.

Peanuts are off the menu since we found out about Sylvia's allergy.  However we all love chickpeas.  Sylvia ate them plain for dinner but I baked some with the seasoning.  It seemed a great way to use one of the limes off our tree in the backyard.  It also meant I could serve up a fairly plain Scottish Vegetable and Barley Soup which is not high in protein.

The chickpeas were lovely and full of flavour.  The sharp lime flavour on the marinade mellowed with cooking.  My only change would be to try a bit of garlic powder on them.  I would have been interested to find how long they keep but we ate them all before dinner.  They were quite soft so maybe they would have dried out in the fridge overnight.  Must find out.

The other joy last night was that Sylvia, who hasn't been too keen on veg lately, leaned across the table to where I was cutting up carrots and started eating slices off the chopping board.  It is always nice when she decides to eat a vegetable rather than me having to convince her to do so.  Once I saw she liked it, I cut a carrot into flowers (see an example in the photo at the top) and she loved it.  If only feeding kids was always so easy!

For other ideas about baking seasoned chickpeas see these Taco Chickpeas!

Update - Mel noted she had made crunchy chickpeas in the comments and kindly went away and blogged about them - I must try them.

Smoky Lime Chickpeas
Adapted from Food Blogger
makes about one and a half cups

juice of 1/2 large lime
1 tsp honey (or other sweetener)
1/2 - 1 tsp smoked paprika
shake of chilli powder (or to taste)
1/2 tsp finely ground salt
about 1 tsp olive oil
400g tin of chickpeas, rinsed and drained

Mix all ingredients together and toss with chickpeas.  Line a small roasting dish with baking paper and bake for about 20-30 minutes at 200 C.  They are done when most of the dressing is absorbed.  Eat warm or room temperature.  Ours went in an evening so I am not sure how long they keep. 

On the stereo:
Ballads: Moody Blues