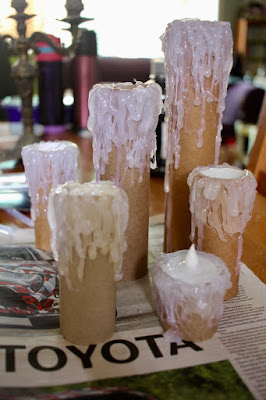
Sylvia and I decided to make candles over Halloween. I took some photos as we went along and want to share them. We got the idea for the candles from Make Life Lovely who have lots of great Halloween crafts.
I bought a hot glue gun a few years ago and this has to be the most I have used it. To start the candles we did lots of drips of hot glue gun glue down toilet paper rolls. This took some time (days) because we needed to take time to let one lot of drips dry before starting on another set of drips. We also went through a few packets of hot glue gun sticks and had to go and buy more sticks a couple of times.
Finally we felt we had dripped enough glue. As we don't use the hot glue gun, it was a good opportunity for me and Sylvia to get more used to the hot glue gun. One of the challenges was trying not to have wispy bits floating about. I found it best to glue from the top and when finished to bring the nozzle up and over the candle so if there were wispy bits they would not go any which way but would fall back into the drip. I also found it hard to get a long even line of glue but I think this was ok for the candles. Wax isn't that neat! You might also notice above the old glue and new glue seemed lightly different coloured, which surprised me. Also we did this with old newspapers below in case there were drips on the table.
Before we began painting I wanted to find a candelabra. In my student days I loved buying old candelabra cheaply from op shops. They were great for student parties and dinners. These days they are mostly up high gathering dust. I had a look at what I had to find one that suited the purpose.
One candelabra had a candleholder with a large square shape at the top, another had no rim under the candleholder but the one in the photo above was perfect because it had a small round candleholder to slip the toilet roll over and a rim under it for the toilet roll to stand on. It is my most gothic candelabra and suited the purpose wonderfully, even with a fifth arm missing. (It is so long since I bought it I can't remember if it was never there when I bought it or fell off at some stage.)
Then we painted the candles black. We used kitchen towel to clean off some of the black paint from the glue before the paint dried. Once it was dry, we painted the glue white with a sponge to make the drippy "wax" stand out. It looked quite impressive.
The most difficult part was getting the LED plastic candles in (real flames would be a OHS nightmare). On Make Life Lovely, she glued some material inside the rolls to hold the candles but our plastic candles only just fitted in the toilet rolls from the bottom but not from the top where bits of glue made the opening tighter. Apart from the tiny candles, we turned on candles before shoving then up the toilet rolls, or used a long stick like a pencil to turn on and off the ones that stuck in the top well. Sadly it was far easier for the rolls to topple off the candleabra than to turn the candles on and off.
We had some fun doing these Halloween candles. Sylvia has plans to paint them red for Christmas. It might work! She also decided to paint her hands black after painting the candles. They made the bath so dirty I had to wash the bath water off in the shower! Kids! They looked quite impressive on a shelf at our Halloween lunch. I wonder how long they will last.


These candles look amazing! Very impressive.
ReplyDeleteThey look great! I'm so sad that Halloween is over because I am going to miss these fun creations :D
ReplyDeleteA post with this title just needs to be read! And what nice craft candles you made.
ReplyDeleteI was wondering what the post would be about - now it makes perfect sense! Very creative stuff. Your kids are lucky to have a crafty mum!
ReplyDelete